Showing posts with label Breads. Show all posts
Friday, March 27, 2015
Cast Iron Pizza Pan Crust {Family Favorite}
Sometimes I seriously wonder if my 4 kids are the Teenage Mutant Ninja Turtles reincarnated. Seriously. They can pack pizza away like high school boys {but they're only ages 2-6} and I find myself having to cut them off. Yes, cut them off like drunks at a bar. {I used to bartend, so I have good experience with this! haha} And as you probably know, ordering pizza from a restaurant can add up quick - real quick. So, I have 4 kids {+1 husband} who can eat pizza like they're competing in an eating challenge and I am trying to save money where I can - it only made sense to start making their favorite food at home. From scratch. Through many, many, many trial and errors - I present to you Cast Iron Pizza Pan Crust!
Tuesday, March 17, 2015
Apple Cider Doughnut Holes {deep-fried}
My kiddo's favorite way to start a Sunday morning is with a bag of doughnut holes from our local doughnut shop. The thought has crossed my mind several time to try and make these precious doughnut holes at home - but I was scared. Scared of creating a total disaster. However, it turns out that deep-fried homemade doughnuts can be made with ease! {I had no idea!} And I was wrong about doughnut holes coming from the cut-out center of a doughnut, they can be made from a batter that is scooped into oil. We had some sparkling apple cider on-hand, as well as some leftover Easy-As-Pie Apple Pie Filling - so I decided to make these Apple Cider Doughnut Holes. These doughnut holes have turned me into a firm believer of homemade doughnuts - which may be bad for my health...
Tuesday, March 10, 2015
Chocolatey-Banana Muffins {delicious ways to use overripe bananas}
The lady who works the checkout counter at my local grocery store swears that I am housing a baby gorilla with the amount of bananas I buy on a weekly basis. You ready for the number? A whopping 42 bananas a week. 42. With six people in our family that each eat a banana-a-day, the bananas add up quickly. However, we all know how fickle kids can be with their food. Love a banana this second, turn their nose up at it the next - so sometimes I have a few bananas leftover at the end of the week. Banana bread is my usual go-to for the leftover fruit, but this week I decided to try something new. Something chocolatey. These Chocolatey-Banana Muffins fit the bill - perfect for a craving of chocolate and to use up those last few bananas.
And of course, right on par with the fickleness was our four-year old - taking a bite into one of these Chocolatey-Banana Muffins and seeing the banana chunks, "NOOOOOO, I don't want bananas!"...
You can please some of the people all of the time, you can please all of the people some of the time, but you can’t please all of the people all of the time. -John Lydgate
Chocolatey-Banana Muffins
{PRINTABLE RECIPE}
yields approx 15 muffins
Ingredients
6 tablespoons butter
4 ounces dark chocolate chips, divided
2 cups all purpose flour
⅔ cup sugar
⅓ cup unsweetened cocoa powder
1 tablespoon baking powder
½ teaspoon baking soda
½ teaspoon salt
1¼ cups buttermilk
1 egg
1 teaspoon vanilla extract
2 cups mashed bananas
Directions
1. Heat oven to 375. Grease muffin pan or fill with liners.
2. Melt butter and half of the chocolate chips in a saucepan over low-heat.
3. Whisk together flour, sugar, cocoa, baking powder, baking soda and salt. In a separate bowl, whisk together buttermilk, egg and vanilla extract.
4. Pour wet ingredients and melted butter mixture over dry ingredients. Use whisk to incorporate ingredients, being careful to not overmix. Stir in remaining chocolate and bananas.
5. Divide batter among muffin cups. Bake for about 20 minutes or until toothpick inserted comes out clean.
6. Cool on a rack. Enjoy!
adapted from Brown Eyed Baker
Wednesday, November 5, 2014
Mimi's Cafe 'Honey Bran Muffins' {Copycat Recipe}
Have you ever tried the Honey Bran Muffins at Mimi's Cafe?
OMG is all I can say, and I never say OMG.
They are ooey, gooey and full of Bran goodness - totally leaving you wanting to
Great part about these muffins is that they are not only good for your tastebuds - they are also packed with healthiness. Like 3 cups of Figs and 1 cup of Bran - so much goodness that it makes it hard to tell the kiddos they can only have one
I'm totally not exaggerating when I tell you that our boys, ages almost 4 and almost 6, chose these Honey Bran Muffins over Halloween Candy last night. I'm sure they would of preferred me to not stare at them while they were eating, but I couldn't help and relish in the fact my boys were packing in figs and bran like it was candy. Awesome stuff right there!!
Mimi's Cafe 'Honey Bran Muffins' {Copycat Recipe}
(PRINTABLE RECIPE)
yields 24 muffins
Ingredients
Honey Glaze
1/2 cup butter
1/2 cup white sugar
1/2 cup dark brown sugar, packed
5 tablespoons honey
3 tablespoons boiling water
Bran Muffins
3 cups figs, raisins, dates or prunes pureed in food processor. Measure before processing. Soaking fruit in water will make the processing easier, however it is not necessary.
1/2 cup honey
1/3 cup vegetable oil
3 large eggs
2 cups buttermilk
1 cup wheat bran
3 cups all-purpose flour
2 1/2 teaspoons baking soda
1 1/2 teaspoons salt
Directions
1.Preheat oven to 375.
Honey Glaze
2.Cream butter with sugars until light and fluffy.
3.Beat in honey and water.
4.Using a brush, coat bottom and sides of muffin tins.
Bran Muffins
5.Sift flour, baking soda and salt together.
6.Mix fruit, honey and oil until smooth.
7.Beat in eggs, then buttermilk and bran.
8.Add flour mixture and mix until just combined.
9.Fill tins ¾ full.
10.Bake for 20-25 minutes or until golden brown on top.
11.Cool for 2 minutes then invert on rack to cool completely.
adapted from Food.com
Tuesday, December 10, 2013
Onion-Cheddar Pumpkin Bread {and a Sweet Creations 4-Cup Mini Loaf Pan Giveaway!}
This post is sponsored by Good Cook, as part of the Good Cook Kitchen Experts program. All opinions are honest and 100% my own.
It's no secret - I heart pumpkin. In fact, I love it so much that I had no control of my hands opening a can and scooping it into this Onion-Cheddar Pumpkin Bread batter. It was just supposed to be Onion-Cheddar Bread, nothing fancy. But I couldn't help myself - the self-control is out the window when it comes to Pumpkin. Plus I had this new Sweet Creations Mini Loaf, 4 Cup Pan, so I was feeling a little ambitious in the kitchen.
The afternoon of baking was a great success for both the bread and the pan - so happy to have both in my cooking life now! I was a tad weary of the bread, but it is a wonderful explosion of flavor. It was the first time I'd tried a savory pumpkin bread and it was awesome. Can't wait to make some more batches of it with different add-ins. The pan worked beautifully and I am so happy to have it in my
Onion-Cheddar Pumpkin Bread {mini loaves}
(PRINTABLE RECIPE)
yields approximately 1 dozen mini loaves
Ingredients
1 cup vegetable oil
1 cup granulated sugar
4 eggs
2 cups pumpkin puree
⅔ cup water
3⅓ cups flour
½ teaspoon baking powder
2 teaspoons baking soda
1½ teaspoons salt
1 teaspoon nutmeg
1 cup cheddar cheese, shredded (plus more to sprinkle on top of bread)
1 medium onion, diced & sauteed
Directions
1. Heat oven to 350. Spray mini-loaf pan with non-stick baking spray.
2) Beat together oil, sugar, eggs, pumpkin, and water.
3) Stir in flour, baking powder, baking soda, salt and nutmeg until combined.
4) Fold in cheese and onions.
5) Fill mini-loaf cavities up halfway, sprinkle a small amount of cheese on top.
6) Bake for 25-30 minutes or until bread is starting to turn golden brown.
7) Remove the bread from the oven, and cool on a rack.
I took these tasty Mini Loaves to our family's Thanksgiving dinner. Since one loaf is a lot of bread when considering how much there is to eat at a Thanksgiving feast, I cut them in half then wrapped them in Plastic Wrap and Sweet Creations White Snow Flake Parchment Paper, finishing them off with a natural string. The parchment paper certainly added the personal, homemade touch I was going for - totally keeping this idea for future use!
Enter to win a Sweet Creations Mini Loaf, 4 Cup Pan and a package of Sweet Creations White Snow Flake Parchment Paper! Open to US only. Giveaway will end December 20, 2013 at 8:00am PST.
a Rafflecopter giveaway
Tuesday, November 12, 2013
Easy to Make Bread Bowls from Walmart Bakery
I am a member of the Collective Bias® Social Fabric® Community. This shop has been compensated as part of a social shopper amplification for Collective Bias and its advertiser. #shop #cbias
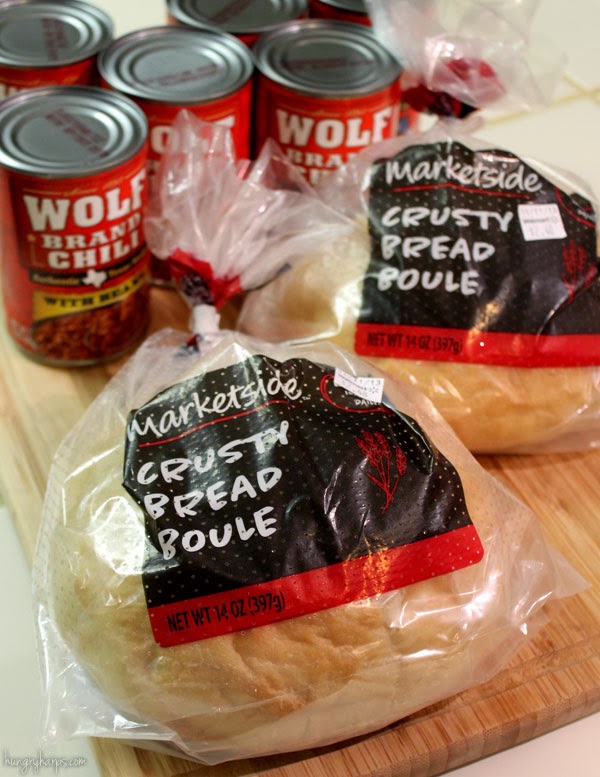
Now that the cold weather is officially here, it's time to bust out our jackets and warm foods! I must admit that I am way more excited about filling up my pantry with cold-weathered foods than my closet with Fall attire. There are so many foods that I miss during the hot summer months, especially chilis, soups, stews and chowders. They just don't satisfy in the hot weather like they do in the Fall and Winter months - the last thing I want is a big pot of boiling anything in the dead of summer. But now it's cold out and it's time to warm our house up, warm our cooking pots up and warm our bellies up! I decided to kick this culinary season off right with enough Wolf Brand Chili for a small army {we have 4 kids so that kinda qualifies, right?} and a couple Bread Bowls from the Walmart Bakery.
There was a wide selection of breads to choose from at Walmart's Bakery, but I already had my heart set on making Bread Bowls for serving chili in. I grabbed a couple Marketside Crusty Bread Boules, which are the same type of bread bowls that we see in the summertime at BBQs and pool parties filled with Spinach Dip. {you will normally find me close nearby, haha} These Marketside Boules are made fresh daily {in-store} and since its from Walmart, you know it will be at the lowest price possible!
Making a Bread Bowl is extremely easy, especially with the help of a serrated knife. Just cut a hole the size that you would want your bowl and carefully pop the lid off. No need to measure, just eyeball it. If I can barely draw a straight line with a ruler but still be successful at making Bread Bowls - you can do it too!!
After the top is popped off, the bread will just peel out by using your fingers. I set all the bread that came out of the inside of the Bread Boule to the side to be devoured by my boys. {husband included!}
Before filling the Bread Bowls up with the Wolf Brand Chili I set them under the broiler for just five minutes to give them a nice golden crispness. While the broiler was doing it's work, I whipped up a Marketside Southwest Chopped Salad that I found in the Walmart Produce department.
To jazz up the canned chili a bit we topped our Chili Bread Bowls with shredded cheese, diced tomatoes, green onions and sour cream. The Southwest Chopped Salad turned out to be the perfect accompaniment to the slight spice in the chili. Our dinner tasted wonderful and was the perfect way to kick off this cold-weather season! The Bread Bowls were surprisingly sturdy and easily held the contents of hot chili, I can't wait to try these out with Clam Chowder next. {then Beef Stew, Tomato Soup, Taco Soup, etc., etc.} I see a lot of sipping and slurping from Bread Bowls in our future this Fall and Winter!
For more information on Walmart's Bakery, make sure to check out their website!
Tuesday, October 22, 2013
Caramel-Apple Biscotti with Pecans {Recipe}
I am a member of the Collective Bias® Social Fabric® Community. This shop has been compensated as part of a social shopper insights study for Collective Bias and their client.
One of our favorite things to do in Fall is to load the kids up in our van and head to a little place called Apple Hill in El Dorado County, California. Apple Hill is a group of over 50 Apple orchards, right next to each other, with countless apple products being offered in the Fall months. Our regular purchase at Apple Hill is a half bushel of Apples {24 pounds} which will last us about two weeks. I don't plan out how long the apples are going to last us and it is inevitable they will be gone before our next jaunt up the hill. This is when we need a quick apple-fix - something closer than 60 minutes away. This is when I head over to my local Walmart produce department and stock up on a variety of Apples to hold the family over to our next trip into Apple Country.
The produce at Walmart is beautifully displayed, nicely priced and fully stocked whenever I am there. {which is more than I should probably admit!} There is a great selection of pre-packaged produce as well as the normal fresh choices and also a decent selection of Organic options. On my most recent trip to the Walmart Produce department I picked up a mix of Apple varieties for both my family to eat and to make Caramel-Apple Biscotti with Pecans with.
This is a real easy recipe, especially with the use of Bisquick. It's pretty much just mix and bake - the hardest part of prep being the peeling and cubing of one apple. The end result is a biscotti that is perfect for pairing with coffee or egg nog during the months of Autumn. Using different apples will result in different flavors - play around and see which one(s) you like best!
Caramel-Apple Biscotti with Pecans
(PRINTABLE RECIPE)
Ingredients
2 tablespoons butter, softened
⅓ cup sugar
1 teaspoon almond extract
½ teaspoon vanilla extract
1 egg
1 egg white
1 ¾ cup Bisquick
1 cup apples, cubed small
1 package(11 oz.) Caramel Bits
2 tablespoons water
1/2 cup pecan pieces
Directions
1. Heat oven to 325. Grease baking sheet.
2. Cream together butter and sugar
3. Add extracts and eggs, beat until combined
4. Fold in apples
5. Form a log on baking sheet. Bake for 35 minutes or until golden brown.
6. Let cool. Slice into ½” slices and place back on baking sheet.
7. Turn oven down to 300 and bake biscotti for additional 20 minutes.
8. Let cool.
9. Heat Caramel Bits and Water in medium saucepan until melted, stirring constantly. Dip ends of biscotti in caramel and then sprinkle with pecan pieces.
For more information on Walmart, check out their website or facebook page.
Monday, October 7, 2013
Connecting Over Coffee & Cinnamon Muffins with Maple-Oat Streusel #loveyourcup
I am a member of the Collective Bias® Social Fabric® Community. This shop has been compensated as part of a social shopper insights study for Collective Bias and their client.
Being the parents to 4 kids (under the age of four), my husband and I need to make a conscience effort to have moments of connection - or else they just won’t happen. It’s not only important for our marriage that we have these little moments, but it’s vital to our family. We can only run like a well oiled machine if we have the same goals in mind and understand where the other person is standing emotionally. {You can have a car with GPS, but if you are driving blind there is going to be a crash!} In order to have this time alone together we wake up earlier than the kids and sneak in a bit of conversation over a cup {or
There are 5 topics that we discuss practically every morning over coffee: upcoming plans, money, our kids, current events and our work schedules. By discussing each of these subjects and staying on the same page with each other, it results in a more open and loving relationship. We are able to quickly resolve disputes because everything has already been put on the table. We don’t agree on everything, but that’s not the point of our discussions – the point is to stay connected and informed of what’s going on in our lives.
Perhaps the most vital to these morning talks is the coffee – the caffeine is a must! Not only do I need a boost to get my day started, it’s also important to perk up a bit before discussing things like money or schedules. I don’t always remember to set the coffee pot auto-brew as I am usually exhausted by bedtime and only have one thing in mind – my pillow. On these mornings, it’s all about the instant coffee. {Some people may be able to wait for a pot of coffee to brew, but I have a history of falling back asleep while waiting! haha} In these moments of need, I turn to Nescafe Taster’s Choice.
Nescafe Taster’s Choice is quick, tasty and comes in 5 flavors: House Blend, French Roast, Vanilla, Hazelnut and 100% Colombian. There is also a Decaf House Blend for those times when you don’t want caffeine, but are craving that delicious coffee!
Although my husband is usually a black-coffee-type-guy, he can’t resist the seasonal flavors of Coffe-mate: Pumpkin Spice, Peppermint Mocha and Eggnog Latte. Back in the days, before we had kids, we would just jump in the car and take off to a coffee shop for these flavors – but things are a bit different now. I have become a connoisseur of store bought coffee creamers to say the least. If it’s out there, I have probably tried it. I like to have a couple powdered coffee creamers on hand because they have a LONG shelf life and it’s nice to have a variety without worrying about expiration dates. {The less for me to worry about, the better!}
The other morning I surprised my husband with one of his favorite coffee creamer flavors, Pumpkin Spice, and a couple Cinnamon Muffins with Maple-Oat Streusel. The flavor of the coffee and muffins together was perfect, and a delightful way to start the day. I love our morning talks and cherish the small moments of connection we have together - just the two of us.
Cinnamon Muffins with Maple-Oat Streusel
(PRINTABLE RECIPE)
yields 12 muffins
Ingredients
(Streusel Topping)
1 cup oats
½ cup chopped walnuts
3 tablespoons brown sugar
2 tablespoons melted butter
2 tablespoons maple syrup
(Muffins)
1 cup milk
6 tablespoons butter, melted
2 eggs, beaten
1 teaspoon vanilla extract
2 cups flour
½ cup brown sugar
½ tablespoon baking powder
1 teaspoon salt
1½ teaspoon ground cinnamon
Directions
1. Heat oven to 400. Grease muffin pan or line with liners.
2. In food processor, blend together oats, walnuts, brown sugar, melted butter and syrup. Set aside.
3. Whip together milk, butter, vanilla extract.
4. Mix together flour, sugar, baking powder, salt and cinnamon.
5. Combine flour and milk mixtures together until just blended.
6. Divide half of the mixture over 12 muffins. (it will be about 2 tablespoons for each) Top with half of streusel mixture and then remaining muffin mix and then the rest of the streusel topping.
7. Swirl with knife or skewer or chopstick, etc.
8. Bake for 15 minutes or until inserted toothpick comes out clean.
Sunday, June 30, 2013
Banana-Almond Bread with Bacon
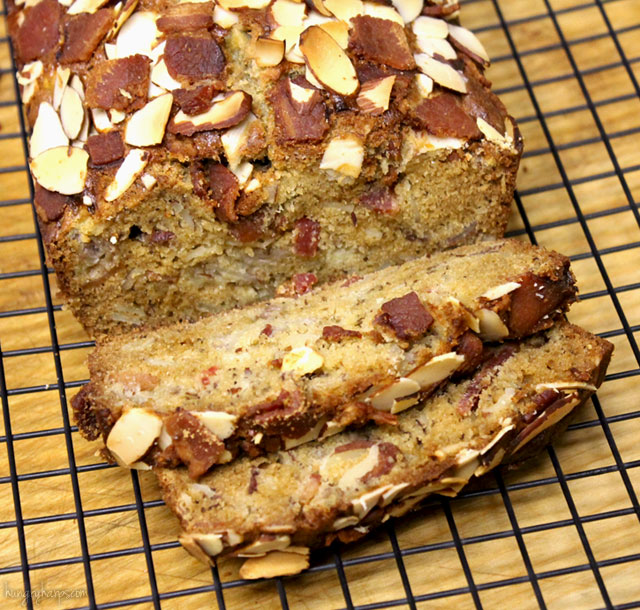
Oh yeah, you read that right - Banana-Almond Bread with Bacon. One of my new favorites! I made this quick bread for the whole family. The bananas were for the kiddos, the sliced almonds for myself and the bacon for the Mister. It was a great hit at our home, vanishing within a couple days.
I am guest posting this recipe over at Anyonita Nibbles - check it out and then poke around Anyonita's site, there is some good cookin' going on over there!
Have a good week!! :)
Wednesday, May 8, 2013
Sweet Potato Bread with Raisins & Pecans
Let me tell you how this Sweet Potato Bread with Raisins & Pecans came about… We were out of sandwich bread the other day and I thought it would be very Susie Homemaker-ish of me to whip up a homemade loaf. Well, one thing turned into another and I ended up making this awesome quick bread.
Delicious? Yes. Substitute for sandwich bread? No.
By this time my kids were ready for lunch and instead of them eating the healthy sandwiches I had planned on – they were sitting there devouring this quick bread that has sugar in it. I tell myself that it’s not all that bad because the bread has sweet potatoes in it – because potatoes totally zero out sugar, right?
But regardless of how this bread came about or what my kids ate for lunch that day – let’s get to how delicious this Sweet Potato Bread is. Everyone who tried it went back for at least seconds if not thirds. I had ended up using my BIG bread pan, which ended up being a very good thing. The bread was gone within three days – the last of it being devoured by our 2 year old.
It really is that good.
The recipe calls for 1 cup cooked sweet potatoes – I prefer to roast mine in big chunks at 350 in the oven, drizzled with olive oil and sprinkled with cinnamon, brown sugar and nutmeg. They take about an hour to cook and will be fork-tender.
I forgot to mention 1 thing. My husband HATES Sweet Potatoes and he ate this bread with the rest of them. Why did we have Sweet Potatoes if he HATES them? Because I was determined to make something with them that he would like – Great Success!!
Sweet Potato Bread with Raisins & Pecans
Ingredients
1 1/2 cups flour
1/2 teaspoon salt
1/2 teaspoon baking powder
1/2 teaspoon salt
1/2 teaspoon baking powder
1/2 teaspoon ground cinnamon
1/2 teaspoon freshly ground nutmeg
1 cup cooked sweet potato flesh
2/3 cup granulated sugar
1/3 cup packed light brown sugar
1/2 cup unsalted butter, melted
2 eggs
1 teaspoon vanilla extract
1/2 cup milk
1/2 cup golden raisins
1/2 cup pecans, chopped
Directions
1. Heat oven to 350.
2. Whisk together flour, salt, baking soda, baking powder, cinnamon and nutmeg.
3. In a stand mixer or with a hand mixer – on low-med speed, fully incorporate the sweet potato and sugars. Add butter and continue to mix until smooth. Add the eggs, one at a time until mixture is smooth. Mix in vanilla. Scrape down sides of bowl. Add half the flour mixture and half the milk, mix on low speed until just combined then add remaining flour and milk. Fold in raisins and pecans.
4. Pour into greased 9x5 bread pan. Bake for 55-60 minutes or until toothpick inserted in bread comes out clean. Let cool in pan for 10 minutes then move to wire rack to finish cooling.
5. Enjoy!!
Wednesday, November 7, 2012
Carrot & Zucchini Muffins
These muffins rock. It's not MY recipe, but one I found on Taste of Home's website and completely worth sharing.
I was browsing around the world wide web for muffins that used vegetables as ingredients. It was pretty much a plotted scheme against my kids - they love muffins but hate to eat vegetables. Turns out my plan work and my kids were gobbling these veggie-packed muffins up like they were cupcakes.
No one really lost here though - I got my kids to eat veggies and they enjoyed eating them, even in the morning. Veggies in the morning? I never thought that possible in a hundred years.
Sidenote: If you don't like carrots or zucchini, try these with caution. The veggie flavor is present but accompanied by the flavors of apples, coconut, cinnamon and almonds.
Enjoy!
Carrot & Zucchini Muffins - PRINTABLE RECIPE
adapted from Taste of Home
Ingredients
2 cups shredded carrot
1 cup shredded zucchini
1 cup chopped peeled apple
3/4 cup flaked coconut
1/2 cup chopped almonds
2 teaspoons grated orange peel
2 cups all-purpose flour
1-1/4 cups sugar
1 tablespoon ground cinnamon
2 teaspoons baking soda
1/2 teaspoon salt
3 eggs, lightly beaten
3/4 cup canola oil
1 teaspoon vanilla extract
Directions
1. Heat oven to 375.
2. Combine together carrot, zucchini, apple, coconut, almonds and
orange zest.
3. In a large bowl, combine flour, sugar, cinnamon, baking soda and
salt.
4. Slightly beat together the eggs, oil and vanilla. Mix into dry ingredients just
until moistened (batter will be thick).
5. Fold in carrot mixture. Fill greased or paper-lined muffin cups
2/3 full.
6. Bake for 20-22 minutes or until inserted toothpick comes out clean. Cool on wire rack.
Monday, April 30, 2012
Avocado-Banana Bread with Pecans
I had originally set out to make a loaf of Banana Nut Bread - it was way overdue and we were all craving a slice. However, I only had 1 banana and needed 2 - oh man. This bread was going to happen one way or the other, so I started thinking about substitutes and then I saw that ripe little avocado looking at me. It was saying, "Use me!" So I did. :)
The recipe also called for 2 eggs and I only had one - so I substituted a 1/4 cup of applesauce in it's place. I really need to start getting my ingredients ready before I start cooking, haha.
My main concern was how the avocado would stand through the baking, but it was fine and stayed in little chunks! Once the bread cooled I served it to guests we had over and the bread was gone within an hour - I just love it when food disappears, it's the biggest compliment I can receive as a cook. :)
Avocado-Banana Bread with Pecans
Ingredients
1 1/3 cups all-purpose flour
¾ teaspoon salt
½ teaspoon baking soda
¼ teaspoon Baking powder
5 ½ tablespoons butter, softened
2/3 cup sugar
2 eggs, slightly beaten
½ cup bananas, mashed
½ cup avocado, roughly diced
½ cup pecans chopped
Directions
1. Heat oven to 350, grease 6-cup loaf pan
2. Mix flour, salt, baking soda, baking powder
3. Beat together butter and sugar until fully combined
4. Slowly add flour mixture
5. Add eggs and mix until combined
6. Fold in bananas, avocados and pecans
7. Pour into loaf pan
8. Bake for 45-50 minutes or until toothpick inserted comes out clean
9. Let cool and enjoy!
For printable recipe click here
Sunday, January 22, 2012
Butternut Squash-Banana Bread with Cranberries
I have a huge collection of cookbooks. It’s really huge, in fact a little too big. I need to find new, loving homes for some of my cookbooks, and I really didn’t know where to start. I thought about taking them to a used bookstore, donating them to a charity, giving them away on Craigslist or maybe having a garage sale and hawking them off… oh, what to do! I ultimately decided to give them away, to my readers. That’s right; I am going to give away my cookbook collection to my readers!! One a week until they are gone – perhaps during the holidays it will be one every two weeks…
This is how it will work: I will post a cookbook up for grabs, if the book is of interest to someone, all you have to do is mention it in a comment. At the end of the week I will take all the individuals interested in the cookbook and pick a reader at Random.org – then I will send that person the cookbook that is up for grabs. Shipping is on me, that’s why we are doing these once a week folks. :) Whatever books do not get picked will all end up going to a charity that has not yet been selected.
This will be fun and I am looking forward to sharing my cookbooks with all of you! The first one up for grabby-grabs is The Frugal Gourmet written by Jeff Smith. This was the first of eleven cookbooks written by Jeff Smith, the host of The Frugal Gourmet TV show that aired on PBS from 1983-1997. I can’t give a review of it because I have never cooked anything from it, as is the case with most of my cookbooks. I love them, I love to collect them – but I rarely use them, hence the giveaway.
I will pick the new owner of The Frugal Gourmet on January 28th and will contact via email – so be sure to include it in your comment. :)
Ok… so about that Butternut Squash-Banana Bread with Cranberries. I received the Butternut Squash in my produce box and wanted to do something fun with it. Since I have been on a Quick Bread kick lately I decided to look around for a Butternut Squash Bread recipe and was OH SO LUCKY to find one at My Baking Addiction. Jamie from Baking Addiction also has an awesome recipe for Butternut Squash Purée, so check it out if you are in need. :) I ended up not having enough Butternut Squash since I was making two loaves, so I substituted the rest with bananas. Since I was not sure how the cranberries would work out I only added them to one loaf – however, if I had to do it again I would have added them to both. These 3 flavors ROCK together. Yes, ROCK!!
Butternut Squash-Banana Bread with Cranberries
Ingredients
1 cup butternut squash purée
1 cup mashed bananas
4 eggs
1 cup vegetable oil
1/2 cup water
2 cup white sugar
1 cup brown sugar
3 ½ cups all-purpose flour
2 teaspoons baking soda
1 teaspoon kosher salt
4 teaspoons ground cinnamon
1 teaspoon ground nutmeg
1 cup dried cranberries, soaked in warm water for 10 minutes
Directions
1. Heat oven to 350 degrees, grease two 6-cup loaf pans
2. Whisk together flour, baking soda, salt, cinnamon and nutmeg
3. Mix together butternut squash, bananas, eggs, oil, water and sugars
4. Combine flour mixture with butternut squash mixture - making sure to not overmix
5. Fold in cranberries
6. Pour into loaf pans
7. Bake for 50-60 minutes or until toothpick inserted comes out clean
8. Let cool, enjoy!
Thursday, January 12, 2012
Banana Nut Bread with Chocolate Chips
The first cookbook I ever fell in love with was Joy of Cooking, the 1997 edition. I have read every recipe at least ten times and I still like to flip through it. Although I have owned the cookbook for over a decade, I have only cooked a handful of recipes from it. The first recipe I tried was the Classic Chocolate Chip Cookies p. 821 – a must try. I could not believe that my two hands were able to create such tastiness. Although my copy of Joy of Cooking is a bit worn now, it is my favorite cookbook. While writing this post I have discovered there was another release of Joy in 2006; a 75th Anniversary edition with 500 new recipes! Oh my goodness, what’s a girl to do?
So about that bread…
Last week I bought enough bananas for us and the primates at the zoo, so I decided to make some Banana Nut Bread. I had never made it before and didn’t have a recipe – so I turned to Joy. Oh yes, there was a recipe for Banana Nut Bread! I knew it was going to turn out good, mostly because Joy has never let me down. I added some dark chocolate chips since I had some on hand. Delicious! :)
Banana Bread
Adapted from Joy of Cooking
Ingredients
1 1/3 cups all-purpose flour
¾ teaspoon salt
½ teaspoon baking soda
¼ teaspoon Baking powder
5 ½ tablespoons butter, softened
2/3 cup sugar
2 eggs, slightly beaten
1 cup mashed bananas – I used two med-large bananas so it was a bit more than a cup, but it still worked great
½ cup walnuts, chopped
½ cup chocolate chips, dark or semi-sweet
Directions
1. Heat oven to 350, grease 6-cup loaf pan
2. Mix flour, salt, baking soda, baking powder
3. Beat together butter and sugar until fully combined
4. Slowly add flour mixture
5. Add eggs and mix until combined
6. Fold in bananas, walnuts and chocolate chips
7. Pour into loaf pan
8. Bake for 50-60 minutes or until toothpick inserted comes out clean
9. Let cool and enjoy!
Tuesday, January 10, 2012
Apple Cinnamon Quick Bread
Fuji apples were on sale at my local grocery store for .78 cents a pound, so I loaded up on them. Then I went home and started searching for some apple recipes, because I had no idea what I was going to do with this new stock I had. I happened across this recipe and gave it a shot – which I am so glad I did. This bread may appear a bit plain but it is bursting with flavor. Everyone in our house loved this bread, even the kids. Enjoy!
Apple Cinnamon Quick Bread
adapted from Food.com
recipe yields 2 loaves
Ingredients
3 cups flour
1 1/2 teaspoons cinnamon
1 teaspoon baking soda
1 teaspoon salt
1/4 teaspoon baking powder
3 eggs
2 cups sugar
1 cup oil
1 tablespoon vanilla
2 cups diced apples (, without skins)
1/2 cup chopped walnuts, coated in 1 tsp of flour
Directions
1. Preheat oven to 350, grease two loaf pans
2. Mix together flour, cinnamon, baking soda, salt and baking powder
3. Beat eggs and add sugar, oil and vanilla
4. Combine flour mixture with egg mixture
5. Add apples and walnuts, mix until just combined
6. Pour into loaf pans
7. Bake for 50-60 minutes or until toothpick inserted comes out clean
8. Let cool and enjoy!
Monday, August 22, 2011
Cornbread Pudding
Bloggers Block. Is that what it is called when you try to write a blog post and can’t muster up one thing to write about? I definitely have it right now, and after 3 days of trying to post this recipe I have decided to just give in and post whatever my fingers type.
My mind has just been a flurry lately, however, I do have a few exciting things to share.
First off, I bought my ticket and booked a hotel room to attend the 2011 Foodbuzz Bloggers Festival. The festival is the first weekend in November and in San Francisco. I am so lucky to be going, and I am so lucky that my wonderful hubby will be joining me! He won’t be going to the festival with me, so we will be spending time together before, in between and after the events. I am beyond excited – for both the festival and to get away for the weekend with my hubby.
Second, I was chosen by Foodbuzz to host a 24x24 meal. It is going to take place this Saturday, August 27th and will be posted by midnight on August 28th. Again, totally excited!! Hungry Harps will be hosting an End of Summer Party – Oyster Meal. That’s all the details for now. ;)
Third, I was nominated for the Sacramento CBS Local, Most Valuable Blogger Award a few weeks ago by my hubby. He told me he had done it at work, but to be honest, I totally forgot about it. The best part? I didn’t even know I was chosen as a finalist until I saw on my blog visitor stats that I had a visitor from CBS Local, so I clicked on the link and what do you know? I am a finalist and in the running to win Most Valuable Blogger in the Lifestyle category for CBS in Sacramento. Way, way cool. Here is the link if you want to vote – don’t feel obligated. I really wanted to share the news with you more than campaign for your vote. :)
http://sacramento.blogger.cbslocal.com/most-valuable-blogger/blog/451-hungry-harps/
I think that should do it. For someone who didn’t have much to say I sure did type a lot…
Enjoy this recipe, it was so good. I imagine it would be awesome as a side dish or a snack on a cold day. On the nights that my husband works late he does not get home until 10:30, so we enjoyed this as a late night snack, it rocked!
I made this recipe since it called for Green Tomato Relish, which I had just received in the mail from Foodzie. Here is a link to Wayne's Green Tomato Relish, it is awesome and I totally recommend it. If you want to make your own, try this recipe for Green Tomato Relish. And here is the link to The Non-Dairy Queen, which the recipe came from. I LOVE FOODZIE!!
Corn Griddle Cakes
Ingredients
Directions
Cornbread Pudding
Ingredients
My mind has just been a flurry lately, however, I do have a few exciting things to share.
First off, I bought my ticket and booked a hotel room to attend the 2011 Foodbuzz Bloggers Festival. The festival is the first weekend in November and in San Francisco. I am so lucky to be going, and I am so lucky that my wonderful hubby will be joining me! He won’t be going to the festival with me, so we will be spending time together before, in between and after the events. I am beyond excited – for both the festival and to get away for the weekend with my hubby.
Second, I was chosen by Foodbuzz to host a 24x24 meal. It is going to take place this Saturday, August 27th and will be posted by midnight on August 28th. Again, totally excited!! Hungry Harps will be hosting an End of Summer Party – Oyster Meal. That’s all the details for now. ;)
Third, I was nominated for the Sacramento CBS Local, Most Valuable Blogger Award a few weeks ago by my hubby. He told me he had done it at work, but to be honest, I totally forgot about it. The best part? I didn’t even know I was chosen as a finalist until I saw on my blog visitor stats that I had a visitor from CBS Local, so I clicked on the link and what do you know? I am a finalist and in the running to win Most Valuable Blogger in the Lifestyle category for CBS in Sacramento. Way, way cool. Here is the link if you want to vote – don’t feel obligated. I really wanted to share the news with you more than campaign for your vote. :)
http://sacramento.blogger.cbslocal.com/most-valuable-blogger/blog/451-hungry-harps/
I think that should do it. For someone who didn’t have much to say I sure did type a lot…
Enjoy this recipe, it was so good. I imagine it would be awesome as a side dish or a snack on a cold day. On the nights that my husband works late he does not get home until 10:30, so we enjoyed this as a late night snack, it rocked!
I made this recipe since it called for Green Tomato Relish, which I had just received in the mail from Foodzie. Here is a link to Wayne's Green Tomato Relish, it is awesome and I totally recommend it. If you want to make your own, try this recipe for Green Tomato Relish. And here is the link to The Non-Dairy Queen, which the recipe came from. I LOVE FOODZIE!!
Corn Griddle Cakes
Ingredients
- 3 cups corn flour (Masa Harina)
- 2 tsp sugar
- 1 tsp baking powder
- 1/2 tsp salt
- 1 egg, beaten
- 3 cups water
Directions
- Combine flour, sugar, baking powder and salt. Add egg and water. Mix well.
- Heat skillet to medium-high. Using a ¼ cup measurement, form patties with your hands and cook until golden brown on both sides. You only need about six cornbread cakes for the pudding, but this recipe will make upwards of 15.
Cornbread Pudding
Ingredients
- 6 corn griddle cakes, diced (about 2 cups)
- 1/3 cup green tomato relish
- 1 cup cheese, shredded
- 1 cup frozen corn
- ¼ cup cooked bacon, chopped
- 1/2 tsp kosher salt
- 1/3 cup milk
- 1 egg, beaten
- ¼ cup green onions, chopped
- Preheat oven to 350
- Add corn cakes, green tomato relish, ¾ cup shredded cheese, corn, bacon, salt, milk and egg to large bowl. Mix until well combined.
- Grease ramekins or 8x8 casserole, add mixture and top with remaining cheese and green onions
- Bake for 40 minutes and tops are golden brown
- Let cool for 15 minutes and enjoy!
Subscribe to:
Posts (Atom)